Wednesday, 29 February 2012

New Floor!

Our new campervan floor is down and making me very happy! We were going to go for a wood effect lino, but I couldn't find one I liked, so we went for black and white tiles. I've seen it in a few other campervans, it seems to be quite a popular choice. 

Here is Nick laying it. The tiles are self-adhesive, so very easy to fit. The whole lot took about 20 mins.


The hole in the middle is where the table leg brackett goes, in case you were wondering.

I am getting VERY EXCITED about this van now.

Sunday, 26 February 2012

Rust

Rust can be an issue with modern vehicles, so imagine what it's like on a 30 year old one. Well, it can look like this.

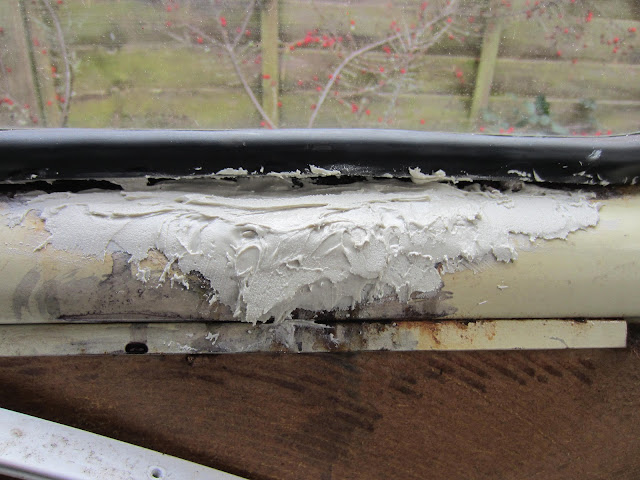
The below two pics are the right and left rear window sills on the inside of the van. So I guess the windows had leaked in the past. I made all the windows watertight a few weeks ago. But as you can see, pretty serious rust to sort out.


This was the inside of the sliding door:


The first step is to scrape the loose rust and paint off (note the frost on the window).


Then you put Kurust on the rust to treat it.


After a couple of hours the Kurust turns rust into a solid paintable surface.


Now, the bit where there is a gaping hole needs filling. You hammer the edges of the hole so that they are depressed (before applying the Kurust). You then stick a piece of mesh over the hole using P38 filler.


Then when that is dry you can use more P38 to fill the hole (messy).


When it's dry, you can sand it smooth.


It can then all be painted. Colour doesn't match but the rust is gone which is the most important thing. We may respray correct colour in the future.


Sprucing Up the Cupboards

Rather than rip all the units out and start again, we decided to give the existing installation a bit of a face lift. We took off all the doors, and gave it a good clean.


We didn't think paint would take to the surface, so we decided to cover the front of the unit in sticky back vinyl.


We choose a white wood effect pattern. I stuck it on in one big piece, and then cut it to shape using a craft knife.


Much better!

Friday, 17 February 2012

Thermal Cooking

My Mum told me about these thermal cookers you can buy. You cook the ingredients of a casserole, curry, etc. on a hob for 15mins or so, then transfer the food to a thermal cooking vessel. These are essentially big thermos flasks, and keep all the heat inside. Leave it 5-7 hours, and the food has carried on cooking due to the trapped heat inside.

Nick and I both like slow cooking, but in a camper van it's not really practical to have something cooking over heat for hours. The thermal cooker seemed like a good substitute, however, they don't seem to be very popular  in the UK, are all too big for two people, and are quite expensive.

So... we decided to see if a normal Thermos flask could do it!


The flask was £20 and is 1.2 litres. For a first test, I made a pork casserole. Here's how it went.

Ingredients:
135g pork (I used pig cheek)
Small onion
Small carrot
Small squash
3/4 pint stock
Tbsp of cornflower
Seasonings


First I chopped the pork and onion and fried these in a little oil. Then I added the chopped squash, carrot, stock and seasonings (salt, pepper, mixed herbs). I then mixed a little cornflower into a paste to add to the mix to thicken the sauce.


This was all brought to the boil and simmered for 10mins or so. In the meantime, the flask is temporarily filled with boiling water to heat up the chamber. 

The casserole is then transferred to the flask, and that's it! Put the lid on and leave for 5-7 hours.

We gave it 5 hours as we were hungry! The results?


Pretty good! The casserole was steaming when we took the lid off. We put it back on the hob for 10mins to bring back to the boil. The sauce was nice and thick, vegetables and meat cooked through. The pig cheek was still a bit fatty - possibly a leaner meat would be better. 

Definitely seems like a technique worth perfecting for life on the road! 

Thursday, 16 February 2012

Curtains

Now I know curtains are probably one of the last things we should be doing in the renovation of our campervan, but I get excited about these kinds of things so I have already made and fitted our new curtains.


Made from scratch, I started off planning to make plain white curtains but when we got the fabric for the bed cushions I decided to sponge print circles all over the fabric in matching colours. I used the offcuts from the bed cushion fabric to make some tie-backs.


The curtains are lined in black out fabric to keep the sunlight out when the sun rises early in the summer, and at night to keep any light coming out to a minimum.

The curtain rail runs the whole way around the van, so I can push them round the front out of the way while we finish the rest of the van :-)

Monday, 13 February 2012

Interior Decisions...

VW never actually made a campervan in the 20th Century (they do now - the boring but probably extremely reliable T5 California). VW made commercial vans, that were then converted to campers by approved conversion companies, the most famous being the German Westfalia. Our own Colonel Mustard was converted by the UK based company Devon, and there were many other companies doing conversions. This is why there is such a range of campervan types out there. 


The interior of our campervan was a classic Devon design that includes a gas fridge, sink and hob, all 100% original. We had to make a decision whether we ripped it all out and started again, or tried to work with what we had.


We had a good look at it all. I know nothing about cars and electrics but I could see it was all looking a bit old and tired. So we decided it would be better to strip it all out and start again! We are keeping the base unit, but all the old electrics and gas work have come out.
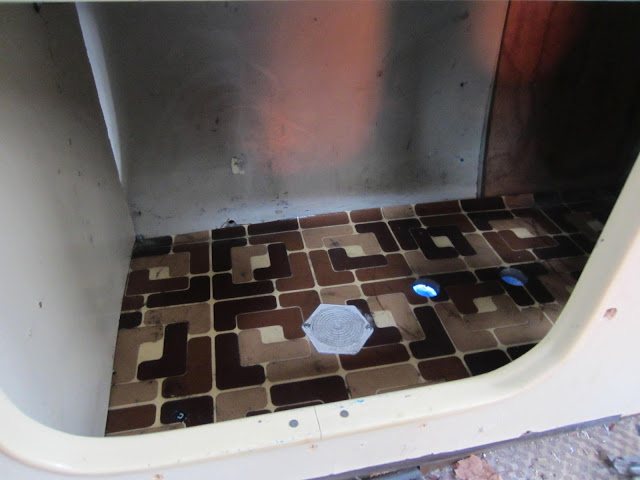
Check out the original floor we have uncovered (complete with 32 years of grime). The blue tube is the plumbing for the sink tap.


Nick taking out the copper piping for the gas fridge. We have decided not to have a gas powered fridge - they are heavy and I don't like the idea of sleeping in the same room as a gas powered appliance. 


We also decided to take out the old cooker. With the gas cylinder it takes up quite a bit of space.


Some more original flooring..


Now we need to decide what set up we will use for cooking and cooling. I think we will just use a coolbox (potentially a powered coolbox) as we will not be keeping meat, etc. for very long, the plan is to buy small amounts of fresh items each day (and there will be plenty of time for that). For a cooker we are thinking about just having a portable stove as we will probably be cooking outside as much as possible - only cooking inside when it rains. 

We are planning on having a few tester weekends before we set off for good to test it all out.


Saturday, 11 February 2012

More Lining

Today we finished off the ceiling lining. We only had to fit one more panel, and then re-attach the curtain rail.


We then trimmed off the excess below the curtain rail.


So here is the ceiling all re-lined. Which is a bit of a milestone because the ceiling was the most skanky part of the whole van.

We have also taken the bed out, ready to be re-sprayed. Also, to get it out the way for the fitting of the side panel.


We then covered the side panel and the rear door panel.


We fitted the rear panel, but won't fit the side panel until we fix a rust patch.


Thursday, 9 February 2012

Cushions

I have to admit, when Nick starts talking to me about electrics, or plumbing etc, my mind starts to wander and I start thinking about cushions. The truth is I'm really not interested in whether the sink or fridge works, I can live without those. But I need to be surrounded by colour! I think it's very important to mental well-being, and with the British weather as it is, we can't always guarantee we will be able to sit outside.


This week I have been finishing off covering our bed cushions. These go on what is called a rock and roll bed, like a sofa bed. It can either be a seat, or pull it out and it makes the bed. Three separate cushions make up the bed, one big one that goes in the boot, and two smaller ones that make up the seat.

Now, original items from the 80's can be quite cool. Vintage, retro if you will. But the original cushions from 1980 in our van were really quite disgusting and who knows what's gone on in there! Originally I was just going to make covers for the existing cushions but they were so old and smelly we threw them away. Our cat Achilles seemed to like them though.


New cushions are ridiculously expensive considering they are just rectangles of foam (put VW in front of anything and you can double the price I reckon). But conveniently we had a cheap foam double mattress in the spare room that we could cut to shape. Because it's a ex-mattress it is nice and thick so should be pretty comfortable, pretty important since we will be sleeping in it long-term.


We got the fabric from John Lewis, we are going for a coastal/beach hut look. I added white piping to the two seat cushions too.


Now, even if we don't end up with a fridge, at least we've got a nice place to sleep.


Monday, 6 February 2012

Seats

When it comes to updating the front cab seats of a VW campervan, the options are pretty limited:
1) Buy new seats
2) Get your seats re-upholstered
3) Buy covers for your seats.

Options one and two will look the best, but are the expensive options. Getting two front seats re-upholstered is around £350, buying brand new seats even more.

So we went for covers. First stop was Halfords, for a pair of generic covers for £30. These were quickly taken back to Halfords as we realised the fit was terrible. 

So we scoured the internet and finally came across seat covers specially made for T25s (and other Volkswagens). They were from a company called http://www.carseatcoversdirect.com/. At £112 a pair, they were a little pricier than the Halfords ones but you could choose colours and materials. 

And here they are:   


They fit quite tightly, so may take a bit of adjusting to fit perfectly but we are really pleased with them. We went for cream leatherette. As you can see below, our original seats were in quite a state.


The customer service was really good and we were given the option of having holes put in the covers for the headrests, but we decided we are taking these out to give us a more open cab area and more of a retro bus look.

LinkWithin

Related Posts Plugin for WordPress, Blogger...